It's that time of year again when we start pondering (struggling) about what to get our loved ones for Christmas. You think of some really great ideas and then head online or to the store and then .. it happens... sticker shock! The ginormous amount of money spent at Christmas time can be overwhelming (and so can the numerous trips to the store!). I'm here to try and help you a little ... a few Do It Yourself project that are perfect for Christmas gifts and are inexpensive ..but will mean lots to the person getting the gift!


Next- cut the sleeves off the sweater
(straight across under the arm pit!)

Voila …slip them on
or wrap them up as a handmade gift!
Now, don’t throw the rest of the sweater away just yet! We’re going to also make a matching cowl
(given the sweater is large enough on the bottom portion of the sweater). Here we go!

Step 1: Cut from bottom of armpit to armpit.

Step 2: Stitch or hand sew along
the edge to keep fabric from unraveling.

Step 3: Fold edge under and stitch along the edge of fold.

Step 4: You’re done!
Double up around your next as an accessory / protection from the cold.

Next…slip it on or wrap it up in
gift wrap!!
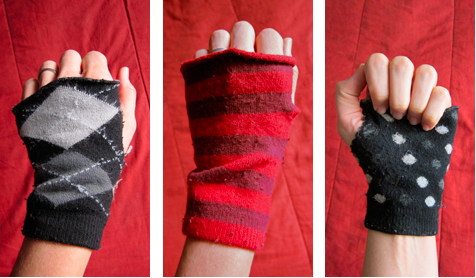
HAND
WARMERS
The next logical DIY craft is hand warmers ….so go grab a few pair of new socks (or I guess you could grab some old ones but only if you’re NOT going to gift them!) and here we go!

Cut off just the toes and then snip a
small hole in the heal of the sock.

Voila! The raw edge should fold itself down automatically.
For shorter socks:

Then it’s just a matter of making a thumb hole in the right spot (use your hand as a guide).

How about something simple but thoughtful? How about a nice latch jar filled with crayons for the little ones in your life? Their parents will thank you! No more crayons being fetched from under the stove..or refrigerator…or who knows where?? Add a fancy bow to the top, add their name to the jar!

How
about a baked goods jar with a cute fabric cover, tied with leather roping?


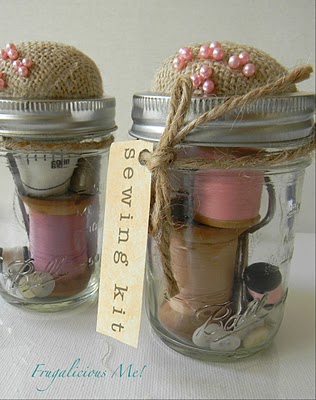
Or for the seamstress (or single
man!!) in your life:
Another great gift for little
children!! Sparkle Play Dough!

Homemade Sparkling
Playdough Recipe
- 2 cups
all-purpose flour
- 1 cup salt
- 2 cups water
- 1 Tablespoon oil
- 1 teaspoon cream
of tartar
- food coloring
- glitter
1) Add food coloring to water
for easiest, even distribution. This is especially helpful if you're using a
gel or paste food coloring.
3) Turn dough out onto the
counter to let sit until it's cool enough to knead. Flatten a bit on the
counter, and sprinkle generously with glitter. Knead the glitter into the
playdough. If you want more sparkle, repeat this step.
4) Store in an airtight
container. One batch of this recipe filled four jam-jars perfectly.

How about some super cute treats to
bring to gatherings?

Bite-sized bits of North Pole magic are just what your holiday party needs!
This delectable balance of salty and sweet is a wonderful way to give everyone
an irresistible taste of the Christmas spirit.
Ingredients
·
Mini
Twist Pretzels
·
White
Chocolate Almond Bark
·
Red
Sanding Sugar
·
Mini
Marshmallows
Instructions
1.
Melt
the white chocolate almond bark according to the directions on the package.
2.
Dip
each mini twist pretzel halfway into the melted white chocolate almond bark.
3.
Dip
each almond bark covered pretzel into the red sanding sugar until only a small
amount of the almond bark is showing. Place on waxed paper.
4.
Cut
the mini marshmallows in half. Use additional melted almond bark to adhere a
mini marshmallow half onto the side of each pretzel. Allow time for the almond
bark to set.
FINALLY...my favorite…for the love in your life… you CAN’T
go wrong with this one. BIG brownie
points. This would be a good one to
print off and leave lying around the house as a huge HINT for your husband!

- Find some playing cards! These fabulous
cards from Ellusionist shown here are great as they have a
pre-aged Vintage look.
- Scuff them up with some sandpaper to give them a used
feel as well as a used look
- Create a template with one of the spare cards (for
example one of the Jokers)
- Punch two holes in each cards using the template as a guide
- Create your reasons labels to attach to the cards -
detailed information below. Use another Joker card to create the front
cover.
- Using double sided tape and/or glue - attach the
inserts to the cards. Using glue will take longer to dry and will stiffen
the cards up adding more dimension.
- Create all 52 of your reasons cards and let the glue
dry
- Thread onto book rings and voila…perfect!
I hope
you enjoyed and hope you make some of these creative, fun DIY project for
Christmas. I know I will!
Be Well!!