Wow..life is so quick! Time is just flying by in my life... I hear little children do that to life.. they make it go by so fast ...so many precious moments!
My husband and I have had a LONG year trying to find a HOME (not just a "house"). After many, many viewings, dissapointment and frustration, we found our new home. Our realtor got creative .. there's a family that was living a few doors down from her that had moved away and they were going to rent out their home .. but our realtor asked them if she could do a one-time showing. They agreed and we got to see the home. We weren't completely taken right away ... ALL of the walls are white ..it looked so cold in there... but after we started talking about the house ..the visions of what colors we'd paint the walls and the addition we'd add on to the back of the house, etc all started coming together and we just knew ..just knew that THAT was THE home/house! The home inspection is on Tuesday ...its a newer home so there shouldnt be any problems but we're keeping our fingers crossed anyway! If the inspection goes well, we should have everything wrapped up within three or four weeks. Then...it's time to paint and recarpet (I'm anal about having new carpet and not lying on other peoples carpet) and then move in... and then... paint and recarpet our existing home and then put that on the market for sale! I'm trying to contain my excitement ... I'm a worry wart and wont let myself scream and shout until I have the keys to the house in my hands:)
Beacause of all of the work I have coming up, I will have to hold off on new custom orders. If you have already submitted an order, I will get through it before the move. Once I get both houses in order and the old one on the market, I can then begin to take custom orders again. The best part .. is ... I finally get a craft room!!! Woooohooooo!! I am so stoked:) My husband finally gets his three car garage (double deep) for all of his toys.. I think he's pretty excited about it!
Anyway- our lives feel a lot more settled now that the search is over. House hunting can be emotionally and physically draining and I'm glad we made it through alive (and still married!!). I'll update the blog again soon :)
Take care!
Amy
Friday, February 15, 2013

Tuesday, January 29, 2013
LS Happenings...
Whew..it's been awhile since I've blogged. Have you ever had one of those months where you're super busy ...but it doesn't seem like you've accomplished much? I had one of those months!
I managed to finish two toddler custom order cowboy hats yesterday.. both size 6-12m, both tan. Right after I finished them, I realized one was supposed to be dark brown 6-12m and the other light brown 0-3m. Really!?!? I was so mad at myself...I'm going to re-do them both this coming weekend but this time, I'll do them right! So I will either be selling the two tan ones on facebook or at Italy Ava..they are super cute.
This past weekend was rough- my wonderful Grandmother passed away on Sunday, January 27th. I had the pleasure and honor of spending a few of her last hours with her the night before..many family members were there as well and I'm so glad I made the trip over to be with her...those are moments I'll never forget. My Grandma was a quilter...she made quilts for her children, grandchildren and great grandchildren...they are the BEST quilts in the world. I was really saddened on Sunday when I received the phone call that she had passed away... I moped around quite a bit. Monday morning I woke up and had the urge to make quilts... I had a feeling it was Grandma visiting me ;) So, I got out some quilting material and made the cutest little girl rag quilt...and then today I started on the cutest little boy rag quilt. There is just something about making quilts that is soothing. I put all of my attention in each piece I make regardless if it's a hairpiece, quilt, hat, etc. but I will admit that much more than my attention goes into my quilts... lots of love go into those..I am so stinking picky when I make those...they must be perfect and I mean absolutely perfect. I guess it's like my materpieces when it comes to sewing..something that relaxes me and makes me forget about lifes challenges. I have a feeling I'll be making a lot of quilts over the next few months:) If you haven't purchased a little rag quilt for the little one in your life, I recommend it... between the costs and time put into the quilts, they are a steal at between $60 and $75..and the best part, they are a keepsake...an heirloom.
I recently posted that I took the plunge and ordered some beautiful little girl headbands that I will sell. It'll be the very first thing that will not be handmade by me that I will be selling. My intention behind that is to have more available for my customers and not be so limited in what I can offer to my customers. I'm waiting (impatiently!!) for them to arrive. If all goes well, I do plan on opening it up to ordering clothing as well .. I think it's a good fit for me. Suggestions are always welcome... I want to make sure I'm ordering things that people love. Pretty exciting!!
I'm still fairly busy with existing custom orders but am really trying to get caught back up so I can resume taking new orders. I am also trying to keep things stocked up in my facebook album entitled "Available for Purchase" which are items that are available for immediate purchase. I also have a selection of items at Italy Ava as well ...and the nice thing about going to Italy Ava is that you can not only get a cute baby gift, you can also find many things for yourself...pamper yourself with a new outfit:)
Well, that's it for now. I'm off to hunt for a new DIY project to share with all of you!
Take care and be well!
Amy
I managed to finish two toddler custom order cowboy hats yesterday.. both size 6-12m, both tan. Right after I finished them, I realized one was supposed to be dark brown 6-12m and the other light brown 0-3m. Really!?!? I was so mad at myself...I'm going to re-do them both this coming weekend but this time, I'll do them right! So I will either be selling the two tan ones on facebook or at Italy Ava..they are super cute.
This past weekend was rough- my wonderful Grandmother passed away on Sunday, January 27th. I had the pleasure and honor of spending a few of her last hours with her the night before..many family members were there as well and I'm so glad I made the trip over to be with her...those are moments I'll never forget. My Grandma was a quilter...she made quilts for her children, grandchildren and great grandchildren...they are the BEST quilts in the world. I was really saddened on Sunday when I received the phone call that she had passed away... I moped around quite a bit. Monday morning I woke up and had the urge to make quilts... I had a feeling it was Grandma visiting me ;) So, I got out some quilting material and made the cutest little girl rag quilt...and then today I started on the cutest little boy rag quilt. There is just something about making quilts that is soothing. I put all of my attention in each piece I make regardless if it's a hairpiece, quilt, hat, etc. but I will admit that much more than my attention goes into my quilts... lots of love go into those..I am so stinking picky when I make those...they must be perfect and I mean absolutely perfect. I guess it's like my materpieces when it comes to sewing..something that relaxes me and makes me forget about lifes challenges. I have a feeling I'll be making a lot of quilts over the next few months:) If you haven't purchased a little rag quilt for the little one in your life, I recommend it... between the costs and time put into the quilts, they are a steal at between $60 and $75..and the best part, they are a keepsake...an heirloom.
I recently posted that I took the plunge and ordered some beautiful little girl headbands that I will sell. It'll be the very first thing that will not be handmade by me that I will be selling. My intention behind that is to have more available for my customers and not be so limited in what I can offer to my customers. I'm waiting (impatiently!!) for them to arrive. If all goes well, I do plan on opening it up to ordering clothing as well .. I think it's a good fit for me. Suggestions are always welcome... I want to make sure I'm ordering things that people love. Pretty exciting!!
I'm still fairly busy with existing custom orders but am really trying to get caught back up so I can resume taking new orders. I am also trying to keep things stocked up in my facebook album entitled "Available for Purchase" which are items that are available for immediate purchase. I also have a selection of items at Italy Ava as well ...and the nice thing about going to Italy Ava is that you can not only get a cute baby gift, you can also find many things for yourself...pamper yourself with a new outfit:)
Well, that's it for now. I'm off to hunt for a new DIY project to share with all of you!
Take care and be well!
Amy
Thursday, January 17, 2013
DIY CUTE owl applique
Visit http://mallorypaige.com/owl-applique/ to download the PDF pattern:)

*If you’re new to appliqué be sure to check out this Appliqué 101 post for extra tips and instructions.*
1. Start by tracing the pattern (provided below) onto your adhesive paper (Heat n’ Bond lite was used for this project) and cutting apart pattern pieces.

2. Place your adhesive paper cutout on the back side (wrong side) of your fabric and press with an iron for about 2 seconds. Then cut along the lines of the traced pattern pieces.

3. Peel the paper backing from the fabric pieces.

4. Layout the design before ironing. For this project I embellished a tea towel. Since I wasn’t too concerned about the placement being exact, I just folded the towel in thirds and eye-balled the design placement onto the front of the towel. If you’re embellishing a child’s shirt, a pillow, or something where you want the placement to be precise, use a ruler and mark where the design should go before ironing.

5. Iron the pieces into place (follow the time recommendation on you adhesive paper instructions). Be sure to iron the beak on before the eye mask – that way you can layer the mask on top of the beak.

6. Consider the personality of your owl before ironing the eyes.

7. Sew along the edges of every piece. After washings and normal use the adhesive paper may lose its stickiness, so be sure to sew through each individual pattern piece.

8. Depending on the look you desire, you can use matching or contrasting thread when sewing.

10. Snip all the loose threads on the back and front of your design.

11. You now have a completed owl!

Not only does this project leave you with an adorable owl, but it only takes a couple hours to complete – great for last minute gifts.
Click to download your free pattern:

If you have any questions, leave a comment and I’ll be happy to help out. Also, be sure to subscribe so you don’t miss any projects, patterns or freebies.
Owl Applique (Step-by-Step and Free Pattern)
*If you’re new to appliqué be sure to check out this Appliqué 101 post for extra tips and instructions.*
1. Start by tracing the pattern (provided below) onto your adhesive paper (Heat n’ Bond lite was used for this project) and cutting apart pattern pieces.
2. Place your adhesive paper cutout on the back side (wrong side) of your fabric and press with an iron for about 2 seconds. Then cut along the lines of the traced pattern pieces.
3. Peel the paper backing from the fabric pieces.
4. Layout the design before ironing. For this project I embellished a tea towel. Since I wasn’t too concerned about the placement being exact, I just folded the towel in thirds and eye-balled the design placement onto the front of the towel. If you’re embellishing a child’s shirt, a pillow, or something where you want the placement to be precise, use a ruler and mark where the design should go before ironing.
5. Iron the pieces into place (follow the time recommendation on you adhesive paper instructions). Be sure to iron the beak on before the eye mask – that way you can layer the mask on top of the beak.
6. Consider the personality of your owl before ironing the eyes.
7. Sew along the edges of every piece. After washings and normal use the adhesive paper may lose its stickiness, so be sure to sew through each individual pattern piece.
8. Depending on the look you desire, you can use matching or contrasting thread when sewing.
10. Snip all the loose threads on the back and front of your design.
11. You now have a completed owl!
Not only does this project leave you with an adorable owl, but it only takes a couple hours to complete – great for last minute gifts.
Click to download your free pattern:
If you have any questions, leave a comment and I’ll be happy to help out. Also, be sure to subscribe so you don’t miss any projects, patterns or freebies.
Wednesday, January 16, 2013
New DIY Baby Leggings!!
A cheap, easy and SUPER adorable way to make baby leggings! I was going to personally do my own tutorial but thought it would be easier and quicker to find one on the internet and share it with you!
Here it is- great tutorial and EASY way to make some leggins for your baby or toddler! Feel free to let me know how they turn out and post a photo of them:)
Here it is- great tutorial and EASY way to make some leggins for your baby or toddler! Feel free to let me know how they turn out and post a photo of them:)
Baby Leggings made easy...
This is a quick and very easy project to make baby leggings from a pair of knee-high kids socks. They’re great for chilly spring mornings when outside and when you're little one is in a baby sling and his/her cute little legs are hanging out... what a great way to stylize him/her!

materials:
one pair of knee socks sized approximately for a 4 year old (I used size L from crewcuts)
7-8″ piece of 1/2″ elastic matching thread.

Step one: cutting the socks
Stack the two socks evenly on top of each other and cut off the toe and heel gusset. You will use the center foot portion, which should be about 3″ long, and the leg.

Step two: sewing the elastic
Pin the 7″ piece of elastic in a ring with 1″ overlapping, making sure not to twist the elastic. If your baby has extra chunky ankles, then use a bit longer piece of elastic. Sew closed with a wide, long zigzag stitch.

Step three: assembling the cuff
Turn the 3″ foot portion of your sock inside out and slide it onto the leg portion until the opening edges meet, right sides facing. Slip the elastic ring you made in step two about an inch from your opening, just enough so your sewing needle won’t catch it when your secure the seam.

Step four: pinning the legging cuff
Fold the foot piece over the elastic, meeting all the cut ends together. Pin in place.

another view looking into the legging:

Step five: sewing the cuff
Using a wide, long zigzag stitch carefully sew around the entire cuff making sure to catch all three layers of fabric and not to catch the elastic.

Voila, baby leggings!

The original cuff at the top will go around the baby’s thighs, and the new cuff that you added goes around their little ankles, keeping the leggings from slipping over the baby’s feet.

I’m not so sure about these purple leggings, mom.
However, on a chilly day, pulling the elastic cuff down over those little feet during play time isn’t a bad idea at all!

Thanks for tuning in!
Stay Well!
Amy

materials:
one pair of knee socks sized approximately for a 4 year old (I used size L from crewcuts)
7-8″ piece of 1/2″ elastic matching thread.

Step one: cutting the socks
Stack the two socks evenly on top of each other and cut off the toe and heel gusset. You will use the center foot portion, which should be about 3″ long, and the leg.

Step two: sewing the elastic
Pin the 7″ piece of elastic in a ring with 1″ overlapping, making sure not to twist the elastic. If your baby has extra chunky ankles, then use a bit longer piece of elastic. Sew closed with a wide, long zigzag stitch.

Step three: assembling the cuff
Turn the 3″ foot portion of your sock inside out and slide it onto the leg portion until the opening edges meet, right sides facing. Slip the elastic ring you made in step two about an inch from your opening, just enough so your sewing needle won’t catch it when your secure the seam.

Step four: pinning the legging cuff
Fold the foot piece over the elastic, meeting all the cut ends together. Pin in place.

another view looking into the legging:

Step five: sewing the cuff
Using a wide, long zigzag stitch carefully sew around the entire cuff making sure to catch all three layers of fabric and not to catch the elastic.

Voila, baby leggings!

The original cuff at the top will go around the baby’s thighs, and the new cuff that you added goes around their little ankles, keeping the leggings from slipping over the baby’s feet.

I’m not so sure about these purple leggings, mom.
However, on a chilly day, pulling the elastic cuff down over those little feet during play time isn’t a bad idea at all!

Thanks for tuning in!
Stay Well!
Amy
Friday, November 30, 2012
Great DIY Christmas gift ideas ... Add more if you'd like!
It's that time of year again when we start pondering (struggling) about what to get our loved ones for Christmas. You think of some really great ideas and then head online or to the store and then .. it happens... sticker shock! The ginormous amount of money spent at Christmas time can be overwhelming (and so can the numerous trips to the store!). I'm here to try and help you a little ... a few Do It Yourself project that are perfect for Christmas gifts and are inexpensive ..but will mean lots to the person getting the gift!


Next- cut the sleeves off the sweater
(straight across under the arm pit!)

Voila …slip them on
or wrap them up as a handmade gift!
Now, don’t throw the rest of the sweater away just yet! We’re going to also make a matching cowl
(given the sweater is large enough on the bottom portion of the sweater). Here we go!

Step 1: Cut from bottom of armpit to armpit.


Step 2: Stitch or hand sew along
the edge to keep fabric from unraveling.

Step 3: Fold edge under and stitch along the edge of fold.


Step 4: You’re done!
Double up around your next as an accessory / protection from the cold.


Next…slip it on or wrap it up in
gift wrap!!
HAND
WARMERS
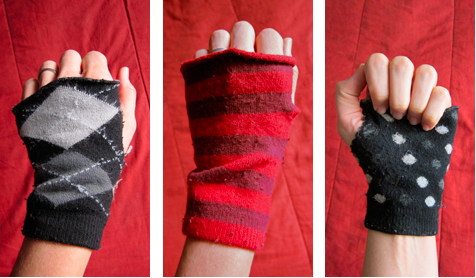
The next logical DIY craft is hand warmers ….so go grab a few pair of new socks (or I guess you could grab some old ones but only if you’re NOT going to gift them!) and here we go!

Cut off just the toes and then snip a
small hole in the heal of the sock.

Voila! The raw edge should fold itself down automatically.
For shorter socks:

Then it’s just a matter of making a thumb hole in the right spot (use your hand as a guide).

How about something simple but thoughtful? How about a nice latch jar filled with crayons for the little ones in your life? Their parents will thank you! No more crayons being fetched from under the stove..or refrigerator…or who knows where?? Add a fancy bow to the top, add their name to the jar!

How
about a baked goods jar with a cute fabric cover, tied with leather roping?


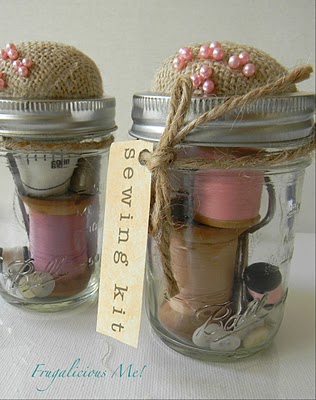
Or for the seamstress (or single
man!!) in your life:

Another great gift for little
children!! Sparkle Play Dough!

Homemade Sparkling
Playdough Recipe
- 2 cups
all-purpose flour
- 1 cup salt
- 2 cups water
- 1 Tablespoon oil
- 1 teaspoon cream
of tartar
- food coloring
- glitter
1) Add food coloring to water
for easiest, even distribution. This is especially helpful if you're using a
gel or paste food coloring.
3) Turn dough out onto the
counter to let sit until it's cool enough to knead. Flatten a bit on the
counter, and sprinkle generously with glitter. Knead the glitter into the
playdough. If you want more sparkle, repeat this step.
4) Store in an airtight
container. One batch of this recipe filled four jam-jars perfectly.


How about some super cute treats to
bring to gatherings?

Bite-sized bits of North Pole magic are just what your holiday party needs!
This delectable balance of salty and sweet is a wonderful way to give everyone
an irresistible taste of the Christmas spirit.
Ingredients
·
Mini
Twist Pretzels
·
White
Chocolate Almond Bark
·
Red
Sanding Sugar
·
Mini
Marshmallows
Instructions
1.
Melt
the white chocolate almond bark according to the directions on the package.
2.
Dip
each mini twist pretzel halfway into the melted white chocolate almond bark.
3.
Dip
each almond bark covered pretzel into the red sanding sugar until only a small
amount of the almond bark is showing. Place on waxed paper.
4.
Cut
the mini marshmallows in half. Use additional melted almond bark to adhere a
mini marshmallow half onto the side of each pretzel. Allow time for the almond
bark to set.
FINALLY...my favorite…for the love in your life… you CAN’T
go wrong with this one. BIG brownie
points. This would be a good one to
print off and leave lying around the house as a huge HINT for your husband!

- Find some playing cards! These fabulous
cards from Ellusionist shown here are great as they have a
pre-aged Vintage look.
- Scuff them up with some sandpaper to give them a used
feel as well as a used look
- Create a template with one of the spare cards (for
example one of the Jokers)
- Punch two holes in each cards using the template as a guide
- Create your reasons labels to attach to the cards -
detailed information below. Use another Joker card to create the front
cover.
- Using double sided tape and/or glue - attach the
inserts to the cards. Using glue will take longer to dry and will stiffen
the cards up adding more dimension.
- Create all 52 of your reasons cards and let the glue
dry
- Thread onto book rings and voila…perfect!
I hope
you enjoyed and hope you make some of these creative, fun DIY project for
Christmas. I know I will!
Be Well!!
Saturday, October 27, 2012
New additions to LS!
Sometims life gets so busy that before you know it, you're completely tangled up in the web of life. Once in awhile, you slow down a bit and take a look around ...and ... you see more clearly and you breath.
It'll be two years in April that I started Little-Snuggle Boutique. I remember I started off by putting a few of my sewing creations on Etsy... and I would stalk the page looking to see if anyone was looking at my baby items... and waiting patiently for a sale. Yes, it shows you how many times your item hs been viewed by others (worst.feature.ever for me!!). Oh my gosh..it seemed like forever .. and then I got my first sale ...and ..it was to a gal in Great Brittan. I was so excited.. I finally had a sale and it was even an international sale!! From there, things slowly trickled in ... life wasn't so busy for me and I was able to enjoy my little ones and still do my hobby. How lucky I was ... and I knew it and I appreciated it.
Here I am 2 years later ... sometimes getting caught up in things and having those moments where I've seemingly lost track of what matters most to me...my family. It's sometimes really tough to run a business and balance it with family. I'm one of those people who listens to those that are older than me... I listen when they tell me that life goes by quickly, that children grow up way too fast and to spend every free moment with them. That you not only need to cherish the "firsts" in your childrens lives but you also need to hold on to the memory of the "lasts" ..the last time they use a bottle.. the last time they need a sippy cup, the last time they NEED to be tucked in, etc. I get that and I believe ALL of it.
Little-Snuggle is my release.. my chance to take something simple and make something beautiful from it. I'm not doing this for the money (have you seen how expensive yarn is lately!!!??), I'm not doing this because I have to... I do it becuase I love doing it and I love using the talents that God has given me. My business has grown substantially over this past year... I have awesome customers, period. Recently I've been scratching my head trying to figure out how I'm ever going to get caught up or keep up with the custom orders that are coming in. For those of you who know me well, I never rush through a project "just to get it done" ..each item I make gets my full, undivided attention. I thought about cloning myself but I'd hate for there to be another one of me around;) So I did the next logical thing ..took a step back and decided I needed some help. I needed someone that loved making handmade things as much as I do, someone who makes them not becuase they HAVE to but because they love to. There is a huge difference in quality of someone making things because they have to, and someone who is making things because they want to. So this person needed to be someone who had passion and talent. It took me about 2 seconds to figure that out... a good friend of mine (also named Aimee, just spelled the wrong way...ha!) is a wonderful knitter .. and she doesn't knit because she has to or needs to, she does it because that's what she loves to do. She is very talented. I immediately sent her a message (literally dug out my phone and sent her a text at that very moment) and asked if she'd be interested in adding her line to Little-Snuggle...and the rest is history!
I never ask for help ... but seriously ..I only have 2 hands and no matter how much I love making things for others, I can only do so much and I really owe it to my customers to have a nice variety of things to choose from, shorter wait times, etc. Up until now, I handmade every single item that I sold. Adding Aimee's line to Little-Snuggle makes perfect sense... customers will have more to choose from and hopefully it'll give me time to get caught up and stay caught up with orders and also spend a little more time with my little girls and that amazing husband of mine.
It will be a couple of weeks of preparing and getting everything ready and set up to bring Aimee's items in. You'll be able to custom order directly through Little-Snuggle and/or purchase items from my Etsy store. Our combined efforts will give customers more options and more choices. Who knows ... adding more in the future is always a possibility as well. A one-stop-baby-shop?:)
Thanks everyone... thanks for taking my tiny little business and making it into something so wonderful. Thank you for inspiring me to always go beyond what I believe I'm capable of. I can't thank you enough.
Be well!
Amy
It'll be two years in April that I started Little-Snuggle Boutique. I remember I started off by putting a few of my sewing creations on Etsy... and I would stalk the page looking to see if anyone was looking at my baby items... and waiting patiently for a sale. Yes, it shows you how many times your item hs been viewed by others (worst.feature.ever for me!!). Oh my gosh..it seemed like forever .. and then I got my first sale ...and ..it was to a gal in Great Brittan. I was so excited.. I finally had a sale and it was even an international sale!! From there, things slowly trickled in ... life wasn't so busy for me and I was able to enjoy my little ones and still do my hobby. How lucky I was ... and I knew it and I appreciated it.
Here I am 2 years later ... sometimes getting caught up in things and having those moments where I've seemingly lost track of what matters most to me...my family. It's sometimes really tough to run a business and balance it with family. I'm one of those people who listens to those that are older than me... I listen when they tell me that life goes by quickly, that children grow up way too fast and to spend every free moment with them. That you not only need to cherish the "firsts" in your childrens lives but you also need to hold on to the memory of the "lasts" ..the last time they use a bottle.. the last time they need a sippy cup, the last time they NEED to be tucked in, etc. I get that and I believe ALL of it.
Little-Snuggle is my release.. my chance to take something simple and make something beautiful from it. I'm not doing this for the money (have you seen how expensive yarn is lately!!!??), I'm not doing this because I have to... I do it becuase I love doing it and I love using the talents that God has given me. My business has grown substantially over this past year... I have awesome customers, period. Recently I've been scratching my head trying to figure out how I'm ever going to get caught up or keep up with the custom orders that are coming in. For those of you who know me well, I never rush through a project "just to get it done" ..each item I make gets my full, undivided attention. I thought about cloning myself but I'd hate for there to be another one of me around;) So I did the next logical thing ..took a step back and decided I needed some help. I needed someone that loved making handmade things as much as I do, someone who makes them not becuase they HAVE to but because they love to. There is a huge difference in quality of someone making things because they have to, and someone who is making things because they want to. So this person needed to be someone who had passion and talent. It took me about 2 seconds to figure that out... a good friend of mine (also named Aimee, just spelled the wrong way...ha!) is a wonderful knitter .. and she doesn't knit because she has to or needs to, she does it because that's what she loves to do. She is very talented. I immediately sent her a message (literally dug out my phone and sent her a text at that very moment) and asked if she'd be interested in adding her line to Little-Snuggle...and the rest is history!
I never ask for help ... but seriously ..I only have 2 hands and no matter how much I love making things for others, I can only do so much and I really owe it to my customers to have a nice variety of things to choose from, shorter wait times, etc. Up until now, I handmade every single item that I sold. Adding Aimee's line to Little-Snuggle makes perfect sense... customers will have more to choose from and hopefully it'll give me time to get caught up and stay caught up with orders and also spend a little more time with my little girls and that amazing husband of mine.
It will be a couple of weeks of preparing and getting everything ready and set up to bring Aimee's items in. You'll be able to custom order directly through Little-Snuggle and/or purchase items from my Etsy store. Our combined efforts will give customers more options and more choices. Who knows ... adding more in the future is always a possibility as well. A one-stop-baby-shop?:)
Thanks everyone... thanks for taking my tiny little business and making it into something so wonderful. Thank you for inspiring me to always go beyond what I believe I'm capable of. I can't thank you enough.
Be well!
Amy
Thursday, October 11, 2012
The Ruffle Scarf DIY tutorial
So I stayed up and made a DIY tutorial video last night (so, so may "retakes") and then woke up this morning and found an even better video right on YouTube!!! So I'm going to share the video I found on YouTube because the angle of the camera is much better in that video (I am not a contortionist and I felt like I was attempting that feat last night, trying to get the right angle!).
If you have any questions..please feel free to ask me! Here's the video:
Thanks for tuning in! You can find a great selection of crochet hooks (remember, something between size G and J) at the Purple Iris Yarn Shop in Marshall, MN along with some great ruffle yarns. The Purple Iris sells the exact same yarn as used in the video tutorial and I believe it's only about $8.50 or so per skein and you only need one! Panton pirouette yarn is GORGEOUS for making these scarves as so is Red Heart's "Boutique Sashay". Happy shopping and happy crocheting!
If you have any questions..please feel free to ask me! Here's the video:
Thanks for tuning in! You can find a great selection of crochet hooks (remember, something between size G and J) at the Purple Iris Yarn Shop in Marshall, MN along with some great ruffle yarns. The Purple Iris sells the exact same yarn as used in the video tutorial and I believe it's only about $8.50 or so per skein and you only need one! Panton pirouette yarn is GORGEOUS for making these scarves as so is Red Heart's "Boutique Sashay". Happy shopping and happy crocheting!
As always...take care and be well!
Amy
Subscribe to:
Posts (Atom)